NordicTrack treadmill → Home Assistant
Older NordicTrack / ProForm / iFit treadmills speak a proprietary Bluetooth protocol — not the standard fitness-machine service, so nothing reads them. We reverse-engineered it and built a tiny ESP32-S3 bridge that streams live speed, incline and weight-aware calories straight into Home Assistant. Powered, it just sits connected — walk up, run, the data lands in HA.
How it works — the protocol
The treadmill advertises as I_TL on service 00001533-1412-efde-1523-785feabcd123 — a Nordic-Semi proprietary board, not Bluetooth FTMS. The full byte-level decode lives in the protocol repo.
Host-polled, not pushed
Nothing streams on its own. The phone app is the clock — it writes a command every 200 ms and the treadmill answers. The bridge replays that poll loop; that was the missing piece for years.
The telemetry frame
Polling FE021403 returns page 0x29: speed = bytes 10–11 ÷100 (km/h), incline = bytes 12–13 ÷100 (%), plus elapsed seconds.
Verified live
Decoded values were confirmed against the console: 3 mph→482, 5 mph→804, 6 %→300. A Python (bleak) reference reader is included for validation.
1 · Flash the bridge
Hardware
- Any ESP32-S3 board (an S3 SuperMini is perfect), ≥4 MB flash.
- Power it from an always-on USB (a wall charger) — not the treadmill — so it’s ready when you step on.
Build & flash (ESP-IDF v5.3)
git clone https://github.com/hms-homelab/nordictrack_t5
cd nordictrack_t5
. $IDF_PATH/export.sh
idf.py set-target esp32s3
idf.py -p /dev/ttyACM0 flash monitor
Provision (once)
- First boot with no creds → it starts a Wi-Fi hotspot
Treadmill-Setup(captive portal) and a BLE provisioning service. - Enter your Wi-Fi + MQTT broker (host / port / user / pass).
- It reboots, connects to the belt, and Home Assistant auto-discovers the iFit Treadmill device over MQTT.
Set-and-forget after that: dual provisioning, NVS-stored creds, mDNS esp_treadmill.local, and MQTT-triggered OTA.
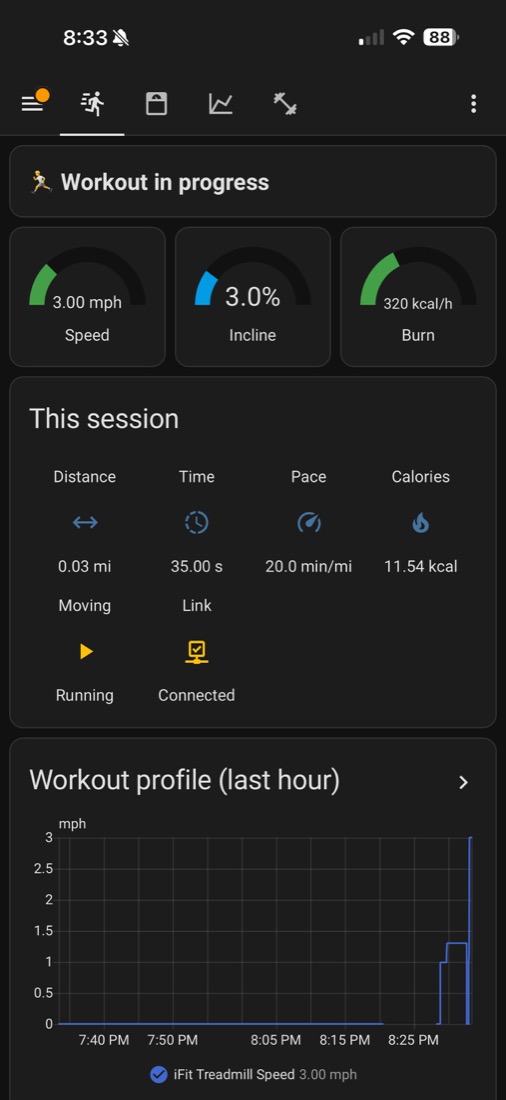
2 · Install the dashboard
Weight-aware calories
Copy homeassistant/templates/treadmill_calories.yaml into your HA templates/ folder, set one placeholder to your smart-scale weight entity, then Developer Tools → YAML → Template entities → Reload. Calories use your real weight (ACSM model) — the console can’t do that.
Fitness dashboard
Settings → Dashboards → Add → New from scratch, open it, then ⋮ → Raw configuration editor and paste homeassistant/dashboards/fitness.yaml. Run / Body / Trends / Suite views, live gauges, and the workout speed profile.
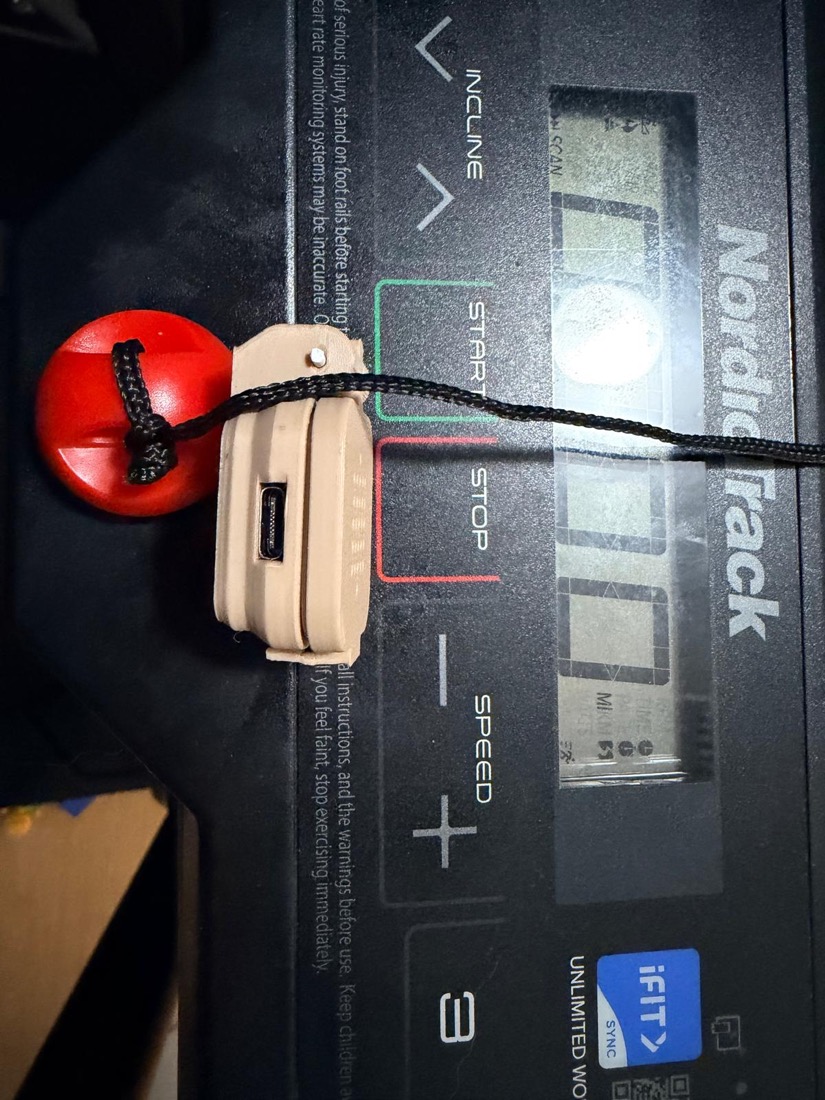
3 · Print the enclosure
A parametric OpenSCAD rugged-box (filament-pin hinge + snap-fit, heat-relief grill, flush USB-C cutout), sized for a single S3 SuperMini. Both the .scad source and ready-to-print STLs ship in the repo under enclosure/.
Just print
Grab enclosure/treadmill-s3-bottom.stl and treadmill-s3-top.stl, print in PETG/PLA, and join them with a ~14 mm snip of 1.75 mm filament as the hinge pin. No screws.
Or tweak & re-export
Edit board dimensions / cutout in the .scad, then export STLs:
cd enclosure
openscad -D 'Part="bottom"' -o bottom.stl treadmill-s3-enclosure.scad
openscad -D 'Part="top"'    -o top.stl    treadmill-s3-enclosure.scad
Build it
Firmware, enclosure, dashboard and the full protocol write-up are open source.